Getting the Hang of Ninja Foodi Grill Recipes: Tasty Concepts for Every Dinner
Ninja Foodi Grill Recipe:
The Ninja Foodi Grill Recipes is a multifunctional kitchen appliance that combines the functions of an indoor grill and an air fryer. It has become a sensation in the culinary world. With the Ninja Foodi Grill’s innovative design and powerful performance, home cooks can create a wide range of meals, such as tender steaks, crisp vegetables, and delectable desserts. If you want to get the most out of your Ninja Foodi Grill and improve your cooking, here are some delectable starter recipes.
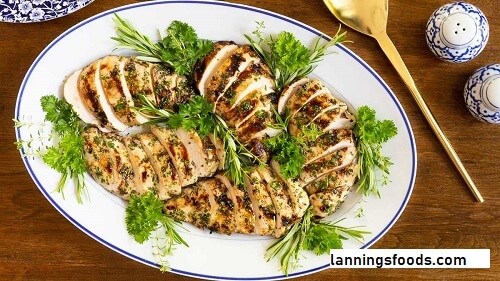
1. Grilled chicken breasts that are juicy:
Ninja Foodi Grill Recipe:
Many people consider grilled chicken breasts to be a staple, but the Ninja Foodi Grill can elevate them to a whole new level. Your chicken breasts will stay moist and flavorful thanks to this recipe.
Ingredients:
Ninja Foodi Grill Recipe:
- Four skinless and boneless chicken breasts
- Two tsp olive oil
- One spoonful of powdered garlic
- One tablespoon of powdered onion
- tsp of paprika
- One tsp of dehydrated oregano
- To taste, add salt and pepper.
Guidelines:
- Using the “Grill” preset, set the Ninja Foodi Grill to 400°F.
- In a small bowl, mix together the paprika, oregano, onion powder, garlic powder, salt, and pepper.
- Lightly coat the chicken breasts with the spice mixture after generously spraying them with olive oil.
- Place the chicken breasts on the grill grate and cook for 6 to 8 minutes on each side, or until the internal temperature reaches 165°F.
- Allow the chicken to rest for five minutes before slicing. Serve with a plate of grilled vegetables or a crisp salad.
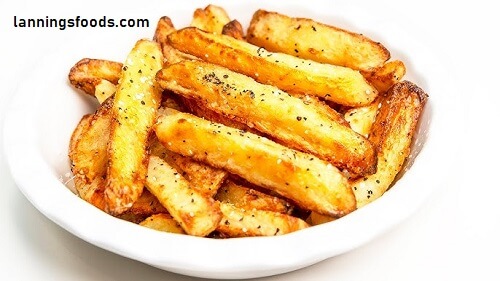
2. Crunchy French Fries Fried in Air:
Ninja Foodi Grill Recipe:
Compared to conventional frying techniques, French fries prepared in the Ninja Foodi Grill have a crispy exterior and a soft interior thanks to reduced oil usage.
Ingredients:
Four big russet potatoes
Two tsp olive oil
One tsp of paprika
tsp powdered garlic
One tsp powdered onion
Add salt to taste.
Guidelines:
- Peel the potatoes and cut them into 1/4-inch-wide, thin strips.
- Soak the potato strips in cold water for at least half an hour to remove excess starch. After carefully draining, pat dry with paper towels.
- Toss the potato strips with olive oil, paprika, onion, garlic, and powdered salt.
- For “Air Crisp” cooking, set the Ninja Foodi Grill to 400°F.
- Place the potato strips in a single layer within the air crisp basket. Halfway through the 15 to 20 minutes of cooking, shake the basket.
- When the fries are crispy and browned, remove from the oven and season with additional salt, if desired.
3. Shrimp Skewers Grilled:
Ninja Foodi Grill Recipe:
These prawn skewers are great for a casual evening meal or a summer BBQ. The Ninja Foodi Grill gives them the perfect char and a smoky flavour.
Ingredients:
One pound of big, peeled and deveined shrimp
Two tsp olive oil
two tsp lemon juice
two minced garlic cloves
One tsp of smoky paprika
A single tsp of dried thyme
To taste, add salt and pepper.
Water-soaked wooden skewers
Guidelines:
- In a bowl, mix together the olive oil, lemon juice, garlic, smoked paprika, thyme, salt, and pepper.
- Add the prawns to the marinade and toss to coat. Allocate 15 to 30 minutes for the marinate.
- Arrange the shrimp onto the moistened wooden skewers.
- Using the “Grill” preset, set the Ninja Foodi Grill to 400°F.
- The prawn skewers should be cooked for two to three minutes on each side, or until they are opaque and pink, after placing them on the grill grate.
- Serve with rice or a fresh salad of vegetables.
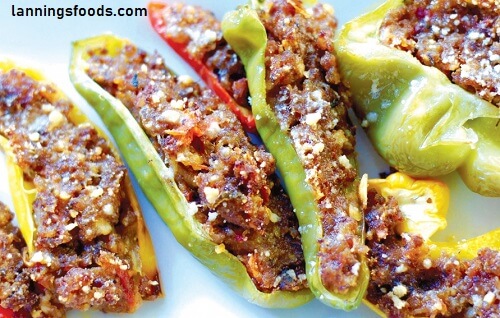
4. Edible Stuffed Peppers:
Ninja Foodi Grill Recipe:
With a perfect tender-crisp texture, these filled bell peppers are a tasty and nutritious dinner that’s made easy to prepare with the Ninja Foodi Grill.
Ingredients:
4 bell peppers with the tops removed and the seeds extracted
One pound of ground turkey or beef
one cup of rice, cooked
One 14.5-oz can of chopped tomatoes
One little onion, chopped
two minced garlic cloves
One tsp of dried basil
One tsp of dehydrated oregano
One cup of shredded cheese, either mozzarella or cheddarTo taste, add salt and pepper.
Guidelines:
Set the Ninja Foodi Grill to “Bake” mode and preheat it to 375°F.
Cook the ground beef or turkey together with the onion and garlic in a skillet over medium heat until it is browned and well cooked. Remove any extra fat.
Add the diced tomatoes, cooked rice, oregano, basil, and salt and pepper to taste. Simmer for five more minutes.
After stuffing the meat mixture inside each bell pepper, stand them upright on the grill grate.
Bake the peppers for 15 to 20 minutes, or until they are soft.
After adding cheese to each pepper, bake for a further five minutes, or until the cheese is bubbling and melted.
5. Rich Chocolate Chip Biscuits
Ninja Foodi Grill Recipe:
Indeed, you can use the Ninja Foodi Grill to make cookies! The texture of these chocolate chip cookies is delightfully chewy, with just a hint of crispiness.
Ingredients:
half a cup of softened butter
1/2 cup of sugar, granulated
Half a cup of dense brown sugar
One big egg
One tsp vanilla essence
1/4 cup of flour for all purposes
One-half tsp baking soda
1/4 tsp salt
One cup of chocolate chips

Guidelines:
Ninja Foodi Grill Recipe:
- Preheat the Ninja Foodi Grill to 350°F in “Bake” mode.
- In a mixing bowl, beat together the butter, brown sugar, and granulated sugar until light and fluffy. Beat in the egg and vanilla extract.
- In a separate basin, combine the flour, baking soda, and salt. Add gradually until thoroughly combined with the butter mixture. Stir in the chocolate chunks.
- On the grill grate, space dough balls the size of tablespoons apart by about two inches.
- Bake for 8 to 10 minutes, or until the edges are golden brown.
- Allow the cookies to cool on a wire rack before serving.